fbpx Skip to main content
Tag

tips

Retouching: What kind of editing do we do?

If you’ve ever wondered why photographers can’t send your photos instantly right after the shoot, this is because the photos need to go through a few processes before reaching their final result! When we shoot, we shoot in a format called RAW, which is not suitable for general use. So first, after the photo shoot is completed, our photographer will transfer the photos to the computer and select the best ones. Next, it gets transferred to an editing software, where our editor would do a basic colour correction on every photo and then export it in JPEG format. We often have clients ask, What do we mean by basic colour correction? Does it include removing pimples, wrinkles, eyebags, etc… Unfortunately, these requests fall under extra editing requests, as they require a longer time and effort to edit. If we do this for every photo, you may not receive your photos within the promised timeline!

Basic Colour Correction

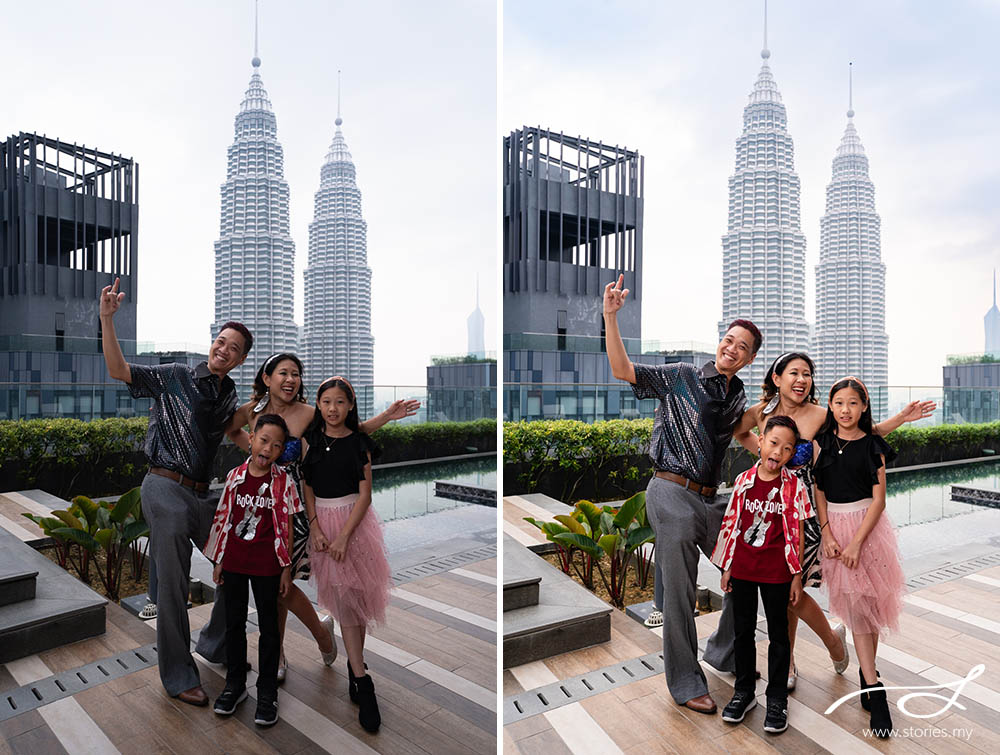
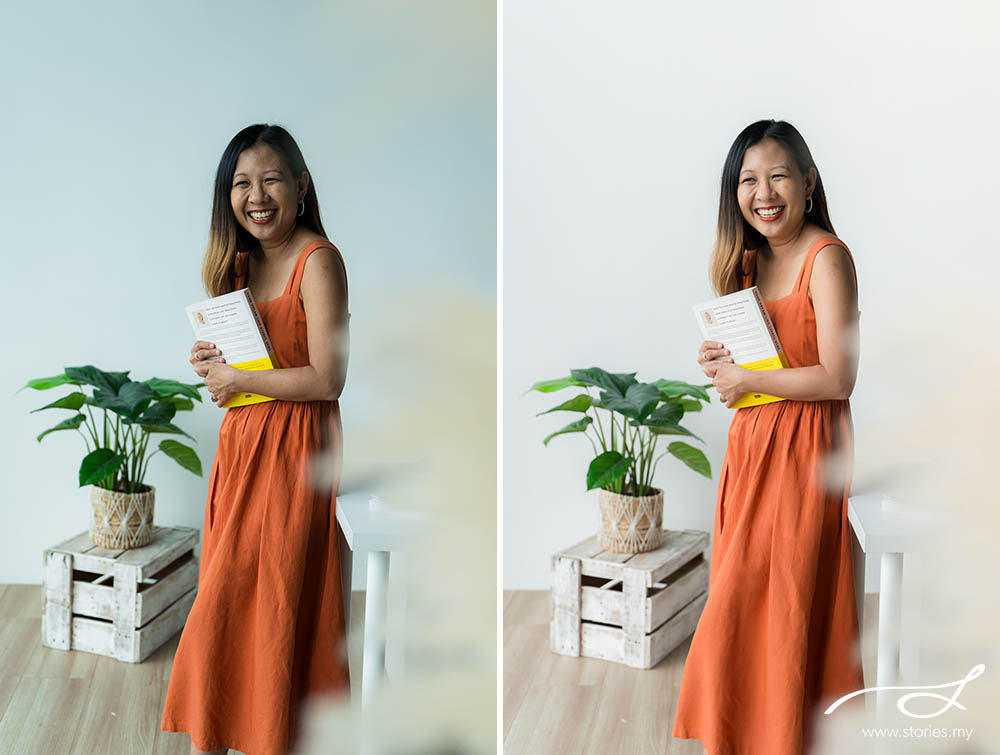
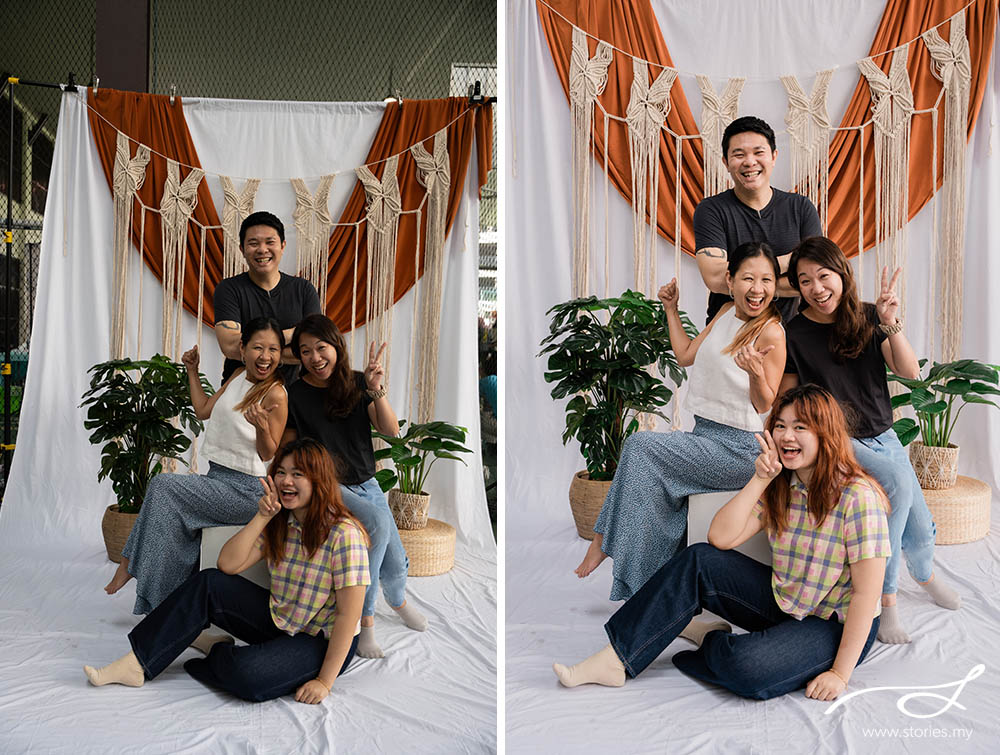
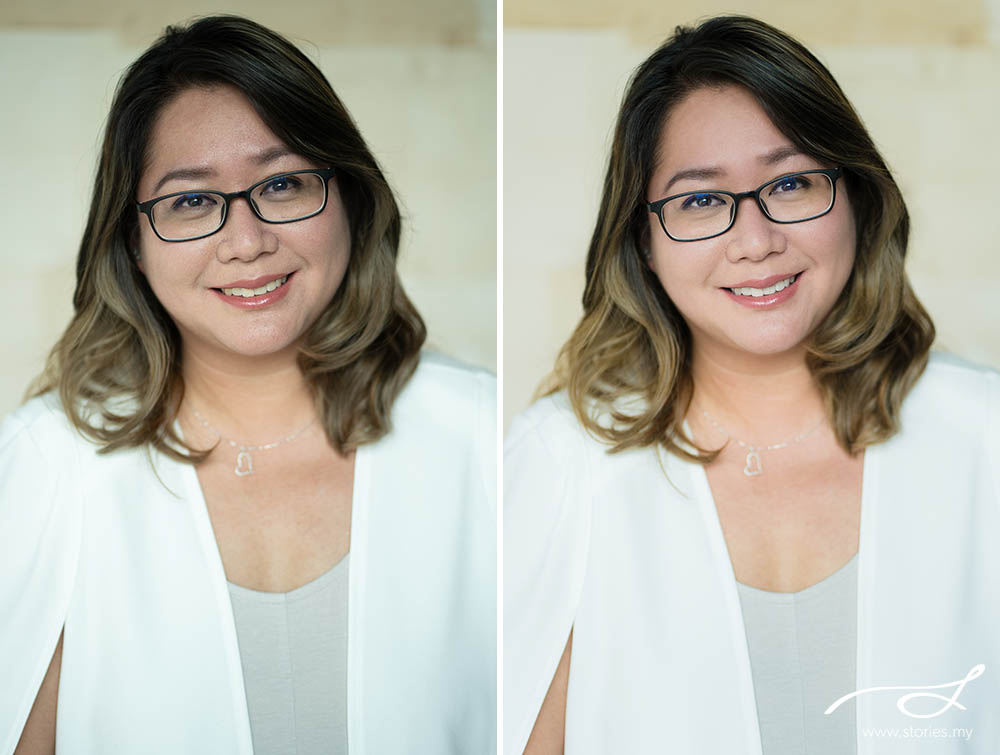
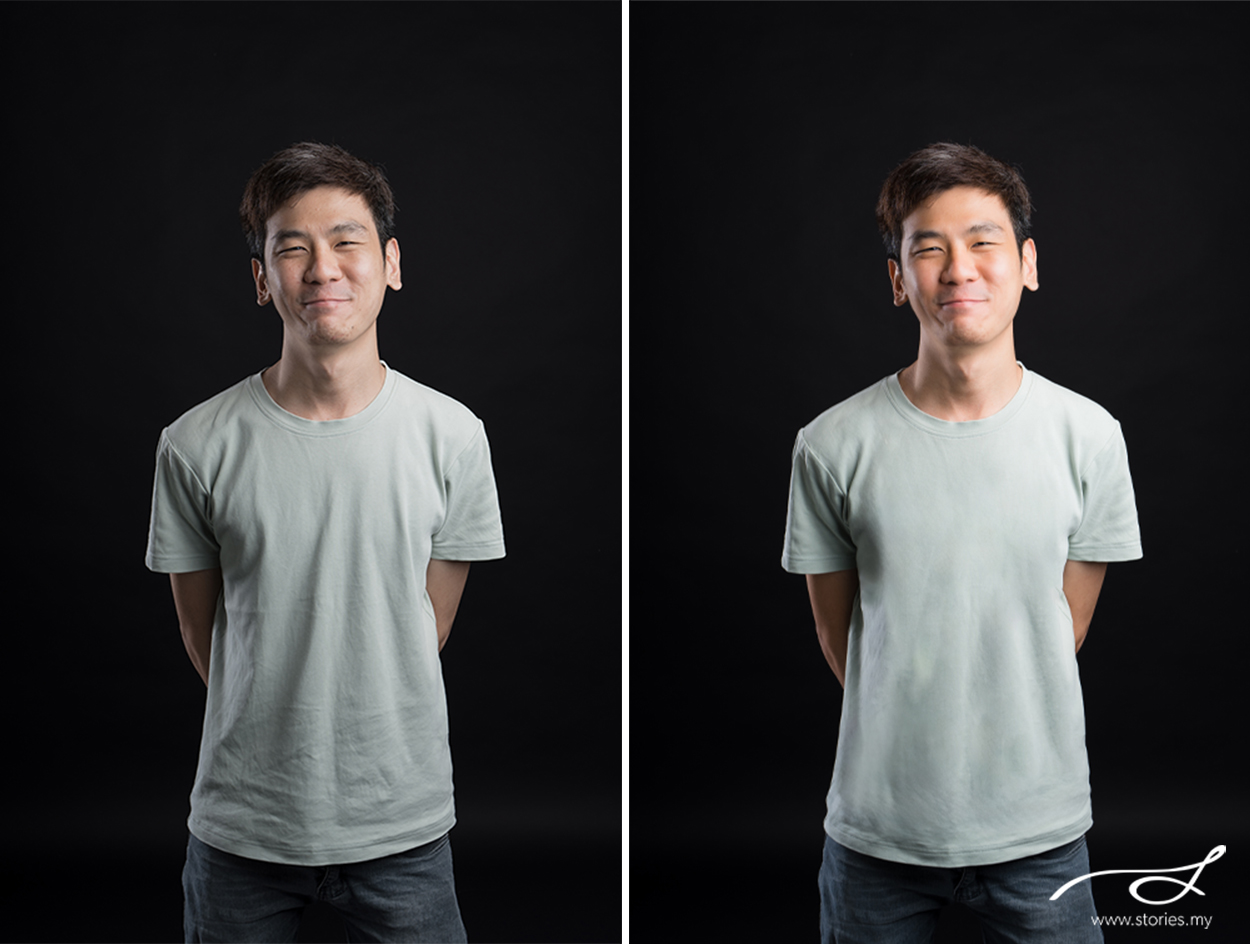
Colours in RAW format are usually lifeless-looking, but it is still the best format to further process in post production. So it’s absolutely a must that we bring some life to the photos! A basic colour correction is essentially adding and balancing out the brightness, colours (saturation), colour temperature, highlights, and shadows of the photos as well as cropping out excessive backgrounds to make the images look more centred. A few toggles here and there will instantly make your photos look more vibrant and captivating!

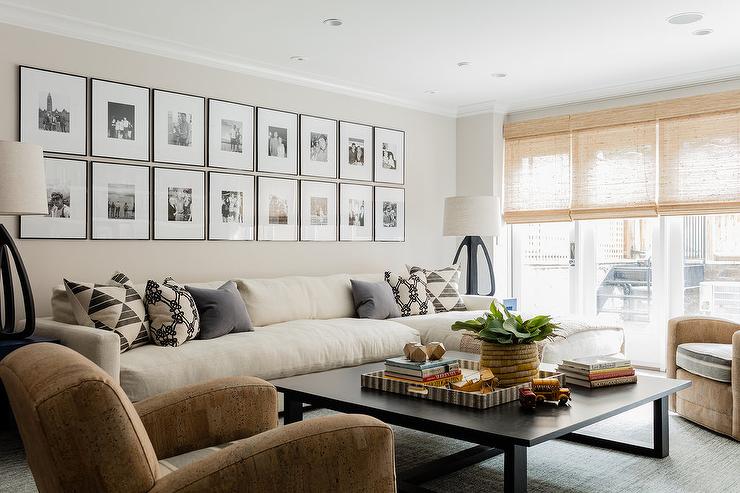
Have a look at the before (left) and after (right) samples here!

Extra Editing

We do offer extra editing services for those who wish to have a “picture-perfect” photograph. This service usually comes FOC when you order framed prints and albums with us. Alternatively, you can add on this service for your favourite selection of images at a minimal additional fee.

Extra editing includes:

  • Skin smoothening
  • Removing skin blemishes
  • Minimizing eyebags/dark circles
  • Minimizing wrinkles
  • Removing flyaway hair
  • Removing any background distractions
  • Removing any scars/wounds
  • Face/Body slimming
  • Minimizing double chins
  • Whitening teeth
  • Make-up retouch (add blush, lipstick, etc)
  • Minimizing creases on clothes

We hope this helps to clarify our editing services. Feel free to reach out to us if you have any more questions!


How to Style Your Photo Wall: Interior Designing Tips by Clover Buildcon

If you’re a visual person, you probably know that your environment can affect your mood and daily productivity levels. It is also likely that you place importance in using your home to channel your personality and individuality. If so, you don’t need a huge budget. This can be communicated through home decoration using your own family photos! Hanging pictures is a balancing act of spacing, colour, and proportion. The way a photo is displayed can be significant and transformative not only to the space it is in, but it can further express the feelings in the photograph itself.

Image by decorpad

Here are a few brilliant tips by our friends at Clover Buildcon Interior Design on how you can use personal photos or artwork to show off your most precious moments in a stylish way!

Which wall should you choose?

Choosing the right wall is essential. Not all walls can be used to display photographs. When we place photographs in the wrong place, it can look odd and confusing. So picking the right wall to feature is fundamental, don’t just pick one randomly. The wall you choose to highlight should ideally be a space where your eye is first drawn towards when you enter the room. Which wall is that?

Also, photographs look best when they are placed on a solid wall without doors or windows. Some common examples are the walls behind sofas and beds. Avoid placing your photographs on walls where there is too much competition for attention or walls that are too small. When we place photographs on the right walls, it creates an interior that adds excitement and importance to the space.

Continue Reading

Tips for Planning Children’s Parties

When I was growing up, I remember the most epic birthday party I had was when I was 8. Growing up in Malacca in the 80s, it wasn’t really common to have major parties for children my age, but my parents had organized my birthday at the new McDonald’s restaurant (the one and only in Malacca at that time!). It was totally memorable for me, especially since my mom baked a gorgeous cake for me, and my friends and I packed into the walk-in freezer to see how long we could stand the cold. I am grateful to my parents for organizing such a party for me.

Now that I have children of own and with the growing influence of Pinterest, DIY groups on Facebook etc, I feel a little ‘pressured’ to do something fun. So a few years ago when my daughter turned 5 and my son turned 3, I organised 2 parties – a unicorn party for my 5 year old and a fireman party for my 3 year old. It was quite fun doing some of the DIY stuff on my own, but unlike my mother, I can only bake instant cakes from those pre-mixes in the supermarket. (Needless to say, I didn’t bake these cakes).

It was a little stressful, but after all that organising, here are some tips to share with other mums who intend to plan their own child’s birthday parties.

1. If you are not good at something, hire someone to do it.

I realised that I was putting additional stress on myself in making some of the decorations myself. I went shopping for goody bags, was busy sorting out the guest list, planning food, AND thinking of how to keep everything under budget. Unless you are the kind of mum who truly enjoys this process, the best way to avoid unnecessary stress is to hire someone to do things for you. There are many great decorators / stylists who are great at what they do! (For my son’s 1st birthday, I had an Up themed party and hired Moments). For his 3rd year party, all I did was call the local fire station, do a site visit, and then let the firemen entertain the kids! (You need to give a donation to hold the party at the local fire station. Some fire stations do not allow parties)

Continue Reading

How To Make A DIY Notebook With Old Photos

Remember the days where you would print out all your photos – even the most random ones? Well, if they’re still around – don’t throw them! Use them to make a DIY notebook! And if you have tons of scrap paper lying around – especially the ones that were only used on one side – this DIY hack will help you save some trees.

Some people cut them in half to create a raw notepad like this:

But why not take it a step further, and personalise your notebook so it looks more like this one below?

Here’s what you need:

Continue Reading

How to Style Your Family for a Photo Shoot

Family gatherings are a perfect opportunity for a photoshoot, whether its a birthday party or festive gathering. However, getting a great family photo sometimes requires a little more than just smiling at the camera. There’s some prep work involved and it’s called “styling”. You don’t have to be a professional fashion consultant to do this. In fact, it’s quite easy! Here are four ways to start having better looking photos with just a little bit of styling done right.


1. Consider your location and backdrop

If your photoshoot coincides with an event such as a birthday party or a dinner, think about how the location will look like: What colour will the wall or backdrop be where your group will be standing? Here’s a good rule of thumb you can follow: 

  • Plain background – You can wear either plain or bright colours, and outfits with more patterns. However not everyone should be wearing prints or else the patterns might clash, making overall photo look too messy. 
  • Busy background – It’s best to wear outfits with plain colours (no patterns) that complement the background. Eg. A green leafy background can go with full white outfits or white and khaki colours.

Continue Reading